Homemade Cookies & Cream: Better Than Store-Bought Perfection
There's a reason why cookies and cream ice cream consistently tops the charts as one of the world's most beloved frozen treats. The irresistible marriage of creamy vanilla ice cream and crunchy, dark chocolate sandwich cookies creates a symphony of textures and flavors that's hard to beat. While store-bought versions offer convenience, there’s an unparalleled joy and superior taste that comes from crafting your own homemade cookies and cream ice cream. It's a journey into creamy perfection that’s easier than you might think, promising a dessert experience far beyond what you'd find in a freezer aisle.
Why Homemade Cookies and Cream Ice Cream Reigns Supreme
The allure of making easy homemade cookies and cream ice cream isn't just about the satisfaction of DIY; it’s about achieving a quality that commercial brands often can't match. When you make it yourself, you control every ingredient, from the richness of the dairy to the quality and quantity of the cookies, and even the subtle hint of vanilla. This control translates into a fresher, more vibrant flavor profile and a texture that's exquisitely smooth, yet studded with perfectly crisp cookie pieces.
- Unmatched Freshness: Store-bought ice cream can sit for weeks; homemade is churned and consumed fresh, maximizing flavor.
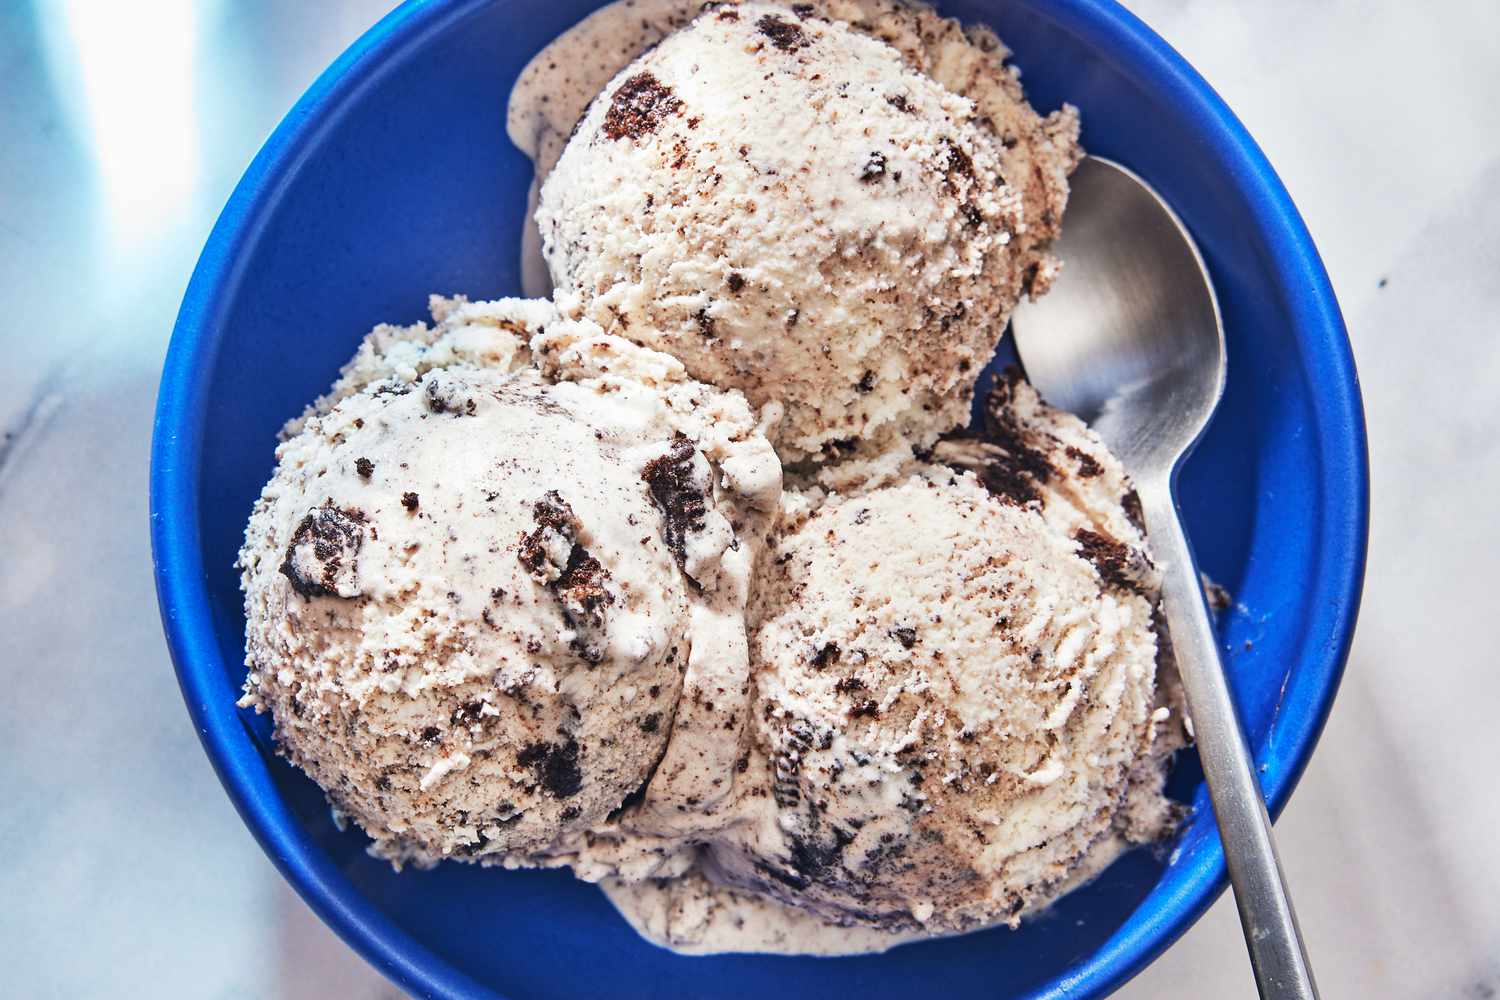
- Superior Texture: Achieve that perfect balance of velvety ice cream and crunchy cookie bits that haven't turned soggy.
- Customizable Sweetness: Adjust sugar levels to your preference, ensuring it's never cloyingly sweet.
- Ingredient Quality: Choose high-quality heavy cream, whole milk, and your favorite brand of chocolate sandwich cookies.
- Personal Touch: There's a certain pride in serving a dessert that guests rave about, especially when it’s your own creation. It truly becomes a requested favorite at gatherings.
The Heart of the Matter: Crafting Your Creamy Base
The foundation of any exceptional cookies and cream ice cream is its vanilla base. This is where the magic truly begins, transforming simple dairy ingredients into a luxurious canvas for your crushed cookies. There are generally two popular approaches to creating this base: egg-based or egg-free.
Egg-Based vs. No-Egg Recipes: A Matter of Preference
Some traditionalists swear by an egg-enriched base, often referred to as a custard base, for its unparalleled richness and density. Eggs, specifically egg yolks, contribute to a wonderfully smooth texture and a higher fat content, which inhibits ice crystal formation, leading to a creamier result. Interestingly, some recipes achieve this richness without the hassle of cooking and tempering eggs, simply by beating them into the mixture until creamy. While some may raise concerns about raw eggs, the freezing process generally mitigates risks. However, if you're uncertain, using pasteurized eggs is always a safe bet.
On the other hand, the no-egg, no-cook method has gained immense popularity for its simplicity and speed without sacrificing much in flavor or texture. This approach typically involves just whisking together heavy cream, whole milk, sugar, and vanilla. It’s perfect for those seeking an easy homemade cookies & cream ice cream with no eggs and no cook. Both methods yield fantastic results, making the choice largely a matter of personal preference and the time you have available.
The Golden Ratio: Achieving Perfect Creaminess
The secret to a truly creamy ice cream lies in the ratio of heavy cream to whole milk. A higher proportion of heavy cream will result in a richer, denser, and more indulgent consistency, reminiscent of authentic Italian gelato. Conversely, reducing the cream and increasing the milk will yield a lighter, less dense ice cream. Experimenting with this balance allows you to tailor the creaminess exactly to your liking. Essential ingredients beyond dairy include:
- Heavy Cream: Provides the bulk of the richness and fat.
- Whole Milk: Balances the richness of the cream and contributes to the overall liquid volume.
- Granulated Sugar: Sweetens the base and helps lower the freezing point, contributing to a softer texture.
- Pure Vanilla Extract: The quintessential flavor for the base, perfectly complementing the chocolate cookies. Use a good quality extract for the best results.
- Pinch of Salt: A seemingly small addition, but a pinch of salt significantly enhances all the other flavors, preventing the ice cream from tasting flat. This technique is borrowed from culinary traditions across the globe for good reason.
The Cookie Factor: Crushing Perfection
Once your creamy base is prepared, it’s time for the star of the show: the cookies! The interaction between the smooth ice cream and the textured cookies is what makes cookies and cream ice cream so iconic.
Choosing Your Cookies Wisely
While Oreo cookies are the undisputed champion and the original choice for cookies and cream ice cream, any chocolate wafer sandwich cookie will do. Generic brands often offer a similar taste and texture, allowing for flexibility based on preference and availability. The key is their distinct dark chocolate flavor and the cream filling, which adds another layer of sweetness and texture.
Mastering the Crunch: Size and Incorporation
The goal is to have distinct pieces of cookie that retain their crunch, not turn into a mushy paste. This means:
- Optimal Crushing: Don't pulverize them into dust. Aim for a variety of sizes, from fine crumbs to pea-sized chunks. A food processor with quick pulses works well, or you can place them in a zip-top bag and gently crush them with a rolling pin.
- Timing is Everything: Add the crushed cookies towards the very end of the churning process, usually in the last 5-10 minutes. This ensures they are evenly distributed but minimizes their exposure to the liquid base, helping them retain their structural integrity and signature crunch after freezing.
Mastering the Churn: Tips for Silky Smooth Results
Achieving that perfectly smooth, scoopable texture for your cookies and cream ice cream relies heavily on proper chilling and churning. These steps are critical to prevent a grainy or overly icy consistency.
Crucial Chilling: The Foundation of Smoothness
Perhaps the most overlooked, yet vital, step in homemade ice cream is thoroughly chilling your base mixture before churning. Warm batter can lead to a "melty mess" in your ice cream maker, resulting in larger ice crystals and a less desirable consistency that won't improve after freezing. For best results, chill your ice cream batter in the refrigerator for at least 4-6 hours, or ideally, overnight. This allows the ingredients to fully hydrate and ensures the mixture is as cold as possible before it even touches your ice cream machine. Properly chilled batter freezes faster, producing smaller ice crystals and a much smoother, creamier end product. For more in-depth advice on this critical step, check out Unlock the Perfect Cookies & Cream: Chilling & Churning Secrets.
Optimizing Your Churning Process
Once chilled, the churning process transforms your liquid base into semi-solid ice cream. If your equipment (like the freezer bowl of your ice cream maker) is properly pre-frozen and your batter is sufficiently chilled, churning should take no longer than 20-30 minutes. Over-churning can cause your ice cream maker to warm up, potentially melting your batter and degrading the final texture.
For those without an ice cream maker, a no-churn method is also an option, typically involving whipping heavy cream and folding it into a sweetened condensed milk base before freezing. While delicious, the texture will be slightly different from churned ice cream.
Post-Churn Freezing: The Final Set
After churning, your ice cream will have a soft-serve consistency. To achieve a firmer, scoopable texture, transfer the ice cream to an airtight container and freeze it for another 2-4 hours, or until solid. An airtight container is key to preventing freezer burn and maintaining that fresh taste.
Serving Suggestions & Beyond
Your homemade cookies and cream ice cream is a versatile delight, perfect for any occasion. Serve it up in classic style in a waffle cone, transform it into an indulgent sundae with extra chocolate syrup and whipped cream, blend it into a thick and satisfying milkshake, or simply enjoy it in a bowl all by itself.
Don't be afraid to get creative! A sprinkle of extra crushed cookies on top never hurts, or perhaps a drizzle of homemade hot fudge for an even more decadent experience. Store your homemade ice cream in an airtight container in the coldest part of your freezer, and it will remain wonderfully fresh for up to two weeks, though it rarely lasts that long!
Embarking on the journey to make homemade cookies and cream ice cream is a rewarding experience. It's a culinary adventure that promises a superior dessert, rich with personalized flavor and an unbeatable texture that will have you, your family, and your guests coming back for more. Say goodbye to store-bought and hello to homemade perfection!
